What is Nearpod?
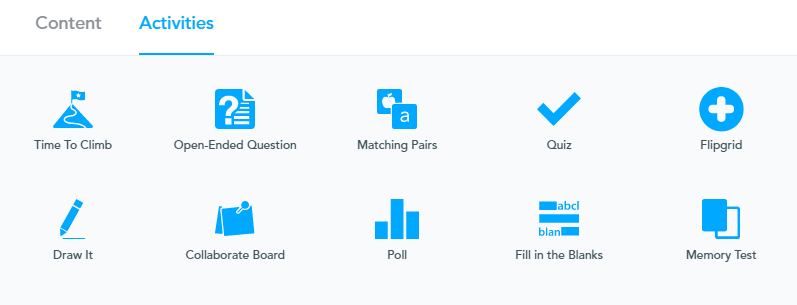
Nearpod is an interactive presentation tool that allows students to respond to questions and complete other activities throughout a presentation. You can use these activities as quick formative assessments and give immediate feedback to students based on their responses. Here are the options for interactive activities:

This blog post gives a great overview of each of the interactive activities.
In Curtis B’s post on Explain Everything, he suggested using Commonsense Media EdTech Reviews when checking out new #edtech tools. Their reviews provide pros, cons, teaching ideas, an overall rating, and ratings for more specific categories (engagement, pedagogy, support). Here is a link to Commonsense Media’s review of Nearpod if you are interested.
Options for Starting Points
You can start by doing any of the following:
- Pick a presentation from the NearPod library. You can filter the library by subject area, grade level, and type of content (lesson, activity, or video). I noticed there were lots of pre-made lessons for Black History Month.
- Create a new presentation from scratch using Nearpod content. At first, I didn’t think I would start from scratch in Nearpod because it seemed too time-consuming.. but I have since had a change of heart. Read on to find out why!
- Upload your own slideshow using PowerPoint or Google Slides and add the interactive features. This is how I decided to play around in Nearpod. Check out my 5-minute walkthrough video below!
Creating a Presentation from Scratch in Nearpod
If you choose to create your own multi-media presentation directly in Nearpod, here are the content options:
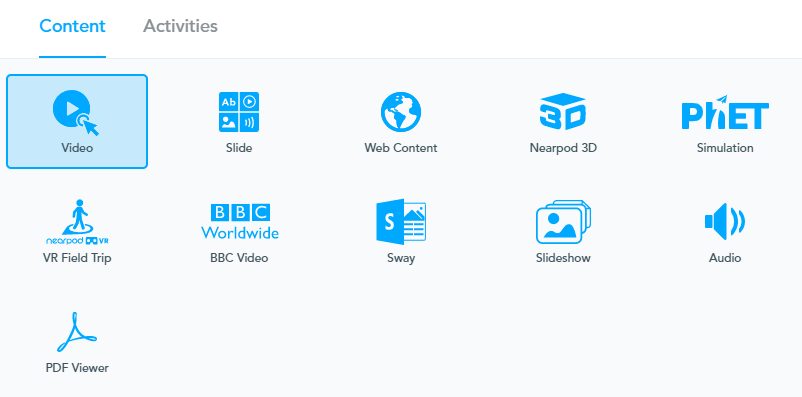
At first, I thought I would stick with uploading PowerPoints I had already created and adding interactive features; starting from scratch seemed too daunting. My change of heart happened yesterday as I was planning a lesson for a virtual class visit. The lesson included a class discussion, listening to an audio clip, reading part of a PDF together, watching and discussing a short video, looking at a web page briefly, and then having students fill out an exit slip.
As I was thinking about all the tabs I would need to have open, I realized I could put everything into Nearpod and I wouldn’t have to worry about all the switching! I actually loved being able to input all these different types of content into a presentation so it would run smoothly and I wouldn’t forget about anything. I also embedded some of the interactive activities, including the collaborate board and several open-ended questions. You can check out the collaborate board from the lesson by clicking here!
Strengths of Nearpod
- Encourages students to actively participate and share their ideas during a lesson
- Beneficial for students who prefer not to speak up during class discussions but are okay with sharing responses using technology (provides a safer environment for some students)
- Allows you to see responses from all students rather than calling on two or three students to share; this gives you a chance to address common themes or questions that emerge
- You can add lots of different types of content (video, audio, PDF, slides, web page, 3D image, and even VR Field Trips) together into one presentation
- You can use it with the whole class or have students work through the content at their own pace
- The collaborate board allows students to add text and images, as well as read and “like” each other’s responses as they appear
- It provides a quick way to get feedback on student learning and see if reteaching or clarification is needed
- You can trim videos and only use the most relevant segments (similar to EdPuzzle)
- You can insert open-ended or multiple-choice questions that pop up during videos and have students submit a response (also similar to EdPuzzle)
- There are some built-in accessibility features, such as audio responses and Microsoft Immersive Reader
- You can upload slideshows you have already created and videos from YouTube
- You can choose to show or hide student names
- It is a free tool
Weakness of Nearpod
- The library contains U.S.-based lesson content
- It can be time-consuming to create and modify presentations
- It is most effective if students have access to 1-to-1 devices
- It might get repetitive for students after the novelty wears off
- The collaborate board doesn’t seem as flexible as Padlet in terms of set-up options or putting multiple questions on the board
- It could become just a fancier way of doing full class discussion
- It could over-emphasize individual student responses rather than small group discussions, depending on how you use it
- As Tessa pointed out in her Review of Nearpod, many of the activities are test-driven (quizzes, multiple-choice, etc.) instead of focused on reflection on learning or creative demonstration of learning
Final Thoughts
Like any #edtech tool, I think Nearpod can be used well or it can be used poorly. I will keep experimenting with Nearpod and aim to use it with purpose in ways that align with my pedagogical beliefs. I think it has the potential to be a great tool for enhancing collaboration and discussion, giving students choice in how they share their ideas, checking for understanding, and combining/organizing lesson materials.
I will leave you will this important reminder:
Wow! You did a fantastic job of reviewing Nearpod. I have never actually created anything using Nearpod, but it seems really user-friendly! I like how you created a tutorial video that explains the features you can use. I did not realize there are so many options for student engagement. The presentation tool that stood out to me was the one that’s similar to Padlet. It would be a great way to check for student understanding and create discussion points, but it’s important to consider the weaknesses you pointed out about the tool as well. You did a great job of outlining the strengths and weaknesses of Nearpod. I am looking forward to using it in the future! Thanks for a great post.
Thanks so much, Amanda!! I definitely found it user-friendly. I like how you can upload already created presentations and add in the interactive features. I agree – the Collaborate Board is probably my favourite tool so far. The students really enjoyed being able to read and “like” each other’s posts.
An interesting overview of Nearpod. It can be an exciting tool for students’ engagement in an environment where the internet and technological gadgets are fully accessible. You did a great job by outlining the strength and the weakness.
Thank you, Issah! Yes, it definitely works better in classrooms that have 1-1 devices. I was actually doing this lesson with two classes at once on Teams and found out that the free version only allows 30 students to join at a time! We had closer to 45 students, so we had to have some of them pair up to discuss and then write a response together.
Pingback: Tools for Online Learning: Is the Medium Really the Message? - Raquel Oberkirsch Portfolio & Blog
Pingback: Improving My Use of Assessment Tech - Raquel Oberkirsch Portfolio & Blog
Thanks for taking the time to discuss and share this with us, I for one feel strongly about it and really enjoyed learning more about this topic.